Thursday, May 5, 2016

So This Happened.....

So....while I have been gone a few things happened. 

First, I lost a bunch of weight and got glasses. I lost 50 pounds! Can you believe it? It took me a little over a year and I have kept it off. I did 21 Day Fix and clean eating. I can't believe how amazing I feel. I am running now and my cholesterol levels have gone from 257 to 150!  It has been such a huge transformation and journey. 


Something else happened that was AMAZING! OMP opened up a store! He has reopened Dr. Tongue's and is now peddling vintage toys and barware. It has been such an awesome year for him! The store is doing great, he is happier than ever and I get to go hang out and play with toys from time to time. 


Not everything has been sunshine and lollipops. We had to say goodbye to Ms. Lola last summer. I miss her every day and she is forever in my heart. She was my entire world and I don't know if I will ever fully heal from losing her. 

Life has been a little crazy the past year. Lots of ups and downs but at the end of the day, we are still just one big crazy family. 


Stay tune for more crafting and crazy life with OMP and the pups! 

Monday, July 13, 2015

Healthy Treats: Muffin, Muffin and Energy Bites

Two post in one day! WOW! Lucky you! There are so many changes going on and I promise to get to them later this week but first I wanted to share these yummy treats with you. Pictured below are Flourless Banana Peanut Butter Muffins, Oat Flour Fruit Muffins and Energy Bites. All are yummy and good for you! 


Flourless Banana Peanut Butter Muffins
These are an adaptation from Averiecooks.com. 
 2 bananas
2 large eggs
1 cup peanut butter ( I used creamy)
6 tablespoons honey
1 tablespoon vanilla extract
1 tablespoon coconut or rum extract (if you don't like either one, you can just add 1 more tablespoon vanilla extract)
1/2 teaspoon baking soda
Cinnamon to taste
Chocolate chips (optional)
Preheat oven to 400 degrees
In a blender, combine all the ingredients except the chocolate chips.
Your mixture will be thin, pourable. 
Line a medium muffin pan with cupcake liners
From your blender, pour batter about 3/4 of a the way up
If you want chocolate chips, add chips to the top of the muffin
Bake for 8-10 minutes or until toothpick comes out clean
Let cool and put in your belly! 

Oat Flour Fruit Muffin:
2 cups oat flour 
2 teaspoons baking powder
1/2 teaspoon cinnamon
3/4 cup vanilla almond milk
1/4 cup maple syrup 
Fresh or frozen fruit (I used a frozen berry mix)
1/8 teaspoon (just a dash) of butter extract
Preheat oven to 375 degrees
Mix all the ingredients, including the fruit 
Line a medium muffin pan with cupcake liners
Pour dough (it will have a funky consistency) about 3/4 of the way up. This is will not rise, so you can even fill it up to the top
Bake for 10-15 minutes or until toothpick comes out clean

Energy Bites 
These bites are great for a quick snack. OMP loves them with chocolate chips, I love them with extra coconut and fruit. 
2 cups dried oatmeal (DO NOT COOK IT!)
1/2  cup unsweetened coconut
1/2 cup peanut butter
1/2 cup honey
1/2 chopped dried cranberries
1/2 cup small chocolate chips
pinch of salt
1 teaspoon vanilla extract
In a mixing bowl, combine all the ingredients. You may want to use your hands to mix everything up. Once all the ingredients are combined, roll into small balls and place in a tupperware container. Place in freezer until you are ready to eat or take them with you. They will soften up when they are out of the freezer but will not crumble. 

There ya go! Three yummy snacks that you can feel good about when you are feeding your pie hole! 


Craftster Quickies: Unpaper Towels


I have been wanting to make these towels forever! Lola is getting older and older and accidents are bound to happen. We were going through paper towels like well....Lola was going through water. Throw in two boy dogs and the messes were getting out of hand. As a novice seamstress, these towels were so easy to make. Check out the video and make some up today! 


Sunday, January 4, 2015

Scrappy Dog Sunday: The Sleepy Edition

YAAAAAWWWWWN! Winter is a time for sleeping! We need to save up our energy for spring and summer squirrel chasing.


Looks like the Pedersen boys had a bit too much fun on Christmas....

Don't bother me...I'm sleeping. It is very exhausting being so cute. 

Other puppies make the best pillows. Lola sleeps where Lola wants. 

In completely unrelated news, it has been very cold here so we got Iggy a sweater. I left for work and he was not happy about his clothing options, but he was warm.
I came home 4 hours later to a nekkid Iggy. Excuse me sir, this house is not a clothing optional beach resort.

Oh well, back to sleep for a few months.

Sunday, December 14, 2014

Cross Stitched Sewing Box


During the holiday season I go a little overboard with Dutch Christmas Cookies . It is the only time of the year I eat them. At the end of Christmas I am left with a bunch of empty tins, that for quite some time, have lived in my pantry, collecting dust. While I could just throw them out or give them to a thrift store, I thought this year I could make Cross Stitched Sewing Box for all my stitchy friends. 

The supplies you need for this project are: 

Cookie Tin
Spray Paint
Drill with small drill bit that you can get your yarn or floss through the hole
Washi Tape
Glue
Cardboard
Scissors
Yarn or floss 
Pen 
Image to cross stitch 


 Creating your pattern on your tin could be your first or second step, depending on what you feel comfortable with. I spray painted my tin first and then added my pattern. The only problem I came up with is that I needed to touch up the paint job after drilling the pattern. If you paint afterwards, you may fill in the holes with paint. At any rate, to add the pattern to top of the tin does require the use of a drill so remember your safety glasses. Tape your pattern onto the lid of the tin and then drill the SQUARES of the graph. Think of how you are going to stitch the cross and this will be a no brainer. Stitch all for corner of each stitch. 


 As you can see from the picture, the holes create a box for your cross stitch. 


 Once you have your holes drilled, your lid should look like this. 


 I used an acrylic yarn to cross stitch the lid but you can use floss if you wish. Acrylic yarn will cause a slight fray, but I kind of like it because it gives the tin a sweater feel to it. 


 Once the lid is done, you can work on the inside of the tin...the guts. Cut two pieces of heavy weight cardboard. One 7.50 inches and the other roughly 4. If your tin is bigger than the average cookie tin, measure your piece of cardboard before cutting. 


I did a preplacement before gluing everything in place. Now that you have everything in place you can glue it in! I glued the two pieces of cardboard together first and then glued it to the bottom of the tin. I used a pen to place where the cardboard was going to sit. I used a glue gun but you can use gorilla glue or another kind of epoxy. 


Fill in your sewing box! I filled my with floss, a pin cushion, pencil, paper, quilting wax, scissors and needleminders 


 I was worried about snagging everything on the holes I drilled so I covered the back with washi tape and then added a magnet with a clip to hold my floss and pattern. 

One down....  more to go! 

Friday, December 5, 2014

A little Christmas Crafting


Christmas crafting has taken over my life. It is so much fun to throw on a silly Christmas movie and get my holiday craft on. I am obsessed with ornament wreaths. They are so easy to make and are super duper fancy.

You can make your very own wreath with this awesome tutorial video I made for Craftster.

Thursday, November 20, 2014

Tute Thursday: Confetti Glassware


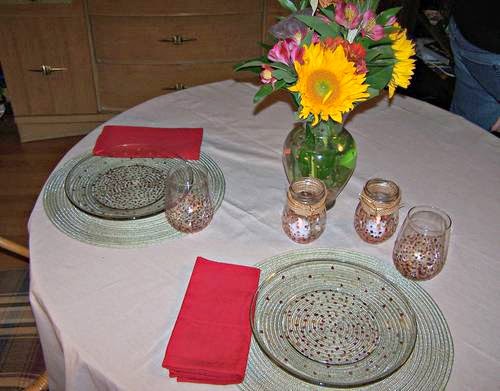
I love the look of confetti glasses and plates. I think it looks so festive but it can be expensive! I bought two glasses and it ended up costing over 20.00! I decided to take matters into my own hands and make my very own. I wanted a nice place setting for Thanksgiving and below is what I created. 

I used glass/enamel paint on the glassware and have washed them several times by hand. Nothing has rubbed off! I think I might make some for Christmas and the summer. 

You can make your own confetti glassware by checking out the latest Craftster video.